NeelakshSaxena/Drishti / .agents/skills/adaptive
adaptive
VerifiedInstructions to make or update an app's UI so that it adapts to different Android devices including phones, tablets, foldables, laptops, desktop, TV, Auto and XR. It includes how to handle different window sizes, pointing devices (such as mouse) and text entry devices (such as keyboard) using the Compose MediaQuery API. It also covers multi-pane layouts using Navigation3 Scenes, adaptive UI components (such as buttons) with varying target sizes, and adaptive layouts (including navigation areas - nav rails and nav bars) using the Compose Grid and FlexBox APIs.
references/android/develop/ui/compose/layouts/adaptive/grid/item-properties.md
View on GitHubWhile the `Grid` config defines the overall structure,
you use the [`gridItem`](https://developer.android.com/reference/kotlin/androidx/compose/foundation/layout/GridScope#(androidx.compose.ui.Modifier).gridItem(kotlin.Int,kotlin.Int,kotlin.Int,kotlin.Int,androidx.compose.ui.Alignment)) modifier to control the position, spanning,
and alignment of items within that structure.
## Set the item position
Place an item into a specific track or cell
with the `row` and `column` parameters.
Coordinate indexes work best for straightforward grid layouts.
For larger or more complex layouts, define [named areas](https://developer.android.com/develop/ui/compose/layouts/adaptive/grid/container-properties#named-area) instead.
The `row` and `column` parameters specify the row and column track indexes
that the item is placed in.
Track indexes are 1-based---they start at one.
Specifying only `row` or `column` (not both) places the item
in the next available space in that track.
Specifying both places the item into that cell.
Use a positive integer to specify the track index from the start.
For example, to place an item in the first row and column,
use `gridItem(row = 1, column = 1)`.
Use a negative integer to specify the track relative to the end.
For example, to place an item in the second-to-last row and column, use
`gridItem(row = -2, column = -2)`.
In the following example, Card **#2** is placed
in the second row and the second column.
Card **#3** is assigned to the last row (indexed by -1),
where it automatically occupies
the first available column in that track (Figure 1).
```kotlin
Grid(
config = {
repeat(2) {
column(160.dp)
}
repeat(3) {
row(90.dp)
}
gap(8.dp)
}
) {
Card1()
Card2(modifier = Modifier.gridItem(row = 2, column = 2))
Card3(modifier = Modifier.gridItem(row = -1, column = -2))
}
```
<br />
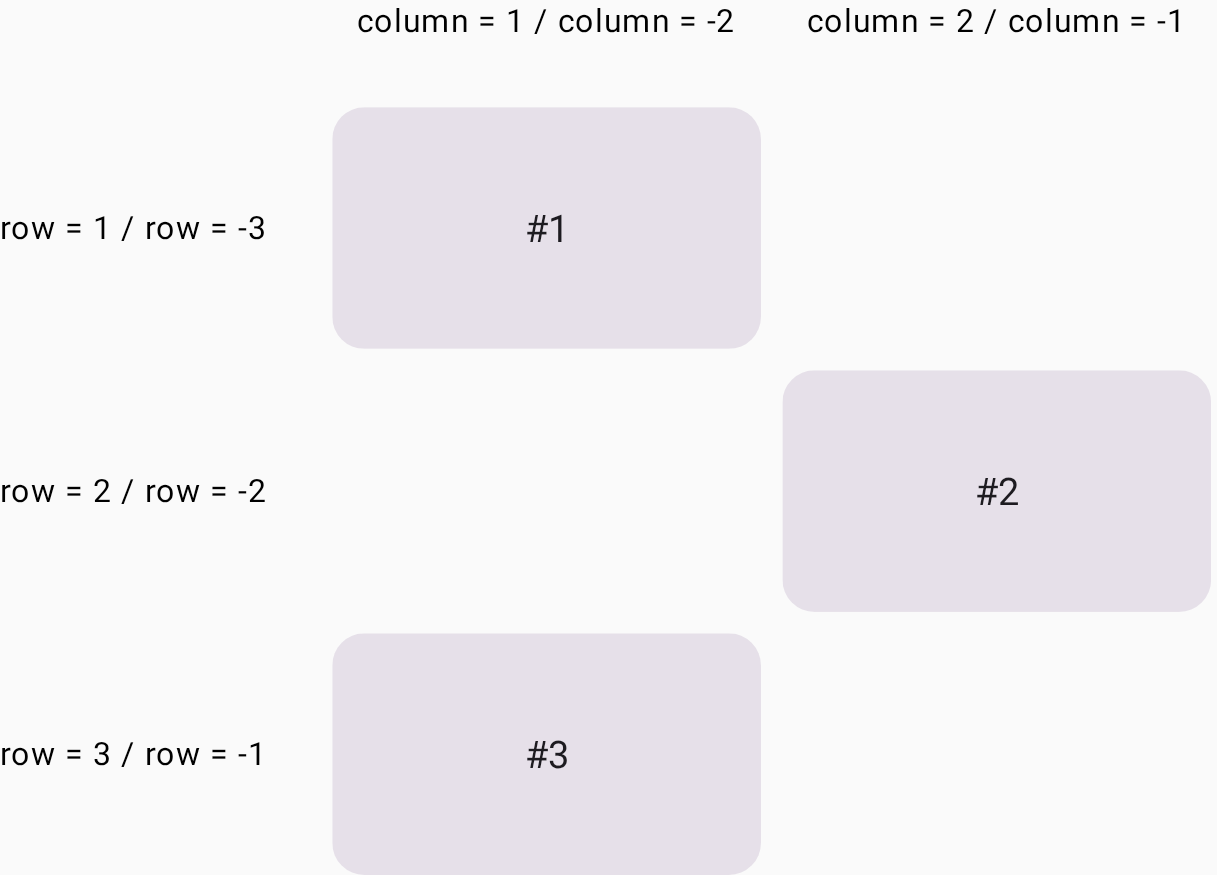 **Figure 1** . Card **#2** is placed in the grid cell in the second row and the second column, and Card **#3** is placed in the first column in the third row.
## Span rows and columns
Use the `rowSpan` and `columnSpan` parameters
to span an item over multiple cells.
You can place a UI element into a [grid area](https://developer.android.com/develop/ui/compose/layouts/adaptive/grid#grid-area),
which is the area consisting of several [grid cells](https://developer.android.com/develop/ui/compose/layouts/adaptive/grid#grid-cell).
The `gridItem` modifier lets you specify the grid area
with the `rowSpan` and `columnSpan` parameters.
In the following example,
Card **#1** is placed in the area consisting of two rows and two columns
(Figure 2).
```kotlin
Grid(
config = {
repeat(3) {
column(160.dp)
}
repeat(3) {
row(90.dp)
}
rowGap(8.dp)
columnGap(8.dp)
}
) {
Card1(modifier = Modifier.gridItem(rowSpan = 2, columnSpan = 2))
Card2()
Card3()
Card4(modifier = Modifier.gridItem(columnSpan = 3))
}
```
<br />
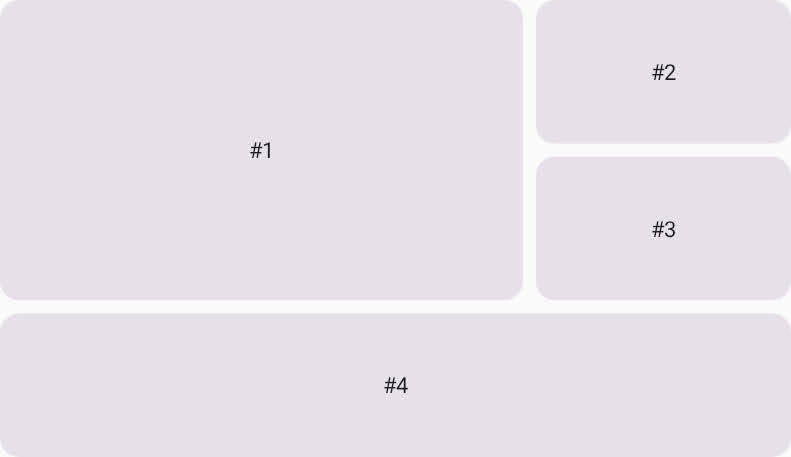 **Figure 2** . Card **#4** spans three columns.
## Set the alignment in a grid area
You can set the alignment of the UI element in a grid area
by specifying it in the `alignment` parameter of the [`gridItem`](https://developer.android.com/reference/kotlin/androidx/compose/foundation/layout/GridScope#(androidx.compose.ui.Modifier).gridItem(kotlin.Int,kotlin.Int,kotlin.Int,kotlin.Int,androidx.compose.ui.Alignment)) modifier.
In the following example, **#1** is placed in the center of the grid area
consisting of two columns and two rows.
```kotlin
Grid(
config = {
repeat(3) {
column(160.dp)
}
repeat(3) {
row(90.dp)
}
rowGap(8.dp)
columnGap(8.dp)
},
) {
Text(
text = "#1",
modifier = Modifier
.gridItem(
rowSpan = 2,
columnSpan = 2,
alignment = Alignment.Center
),
)
Card2()
Card3()
Card4(modifier = Modifier.gridItem(columnSpan = 3))
}
```
<br />
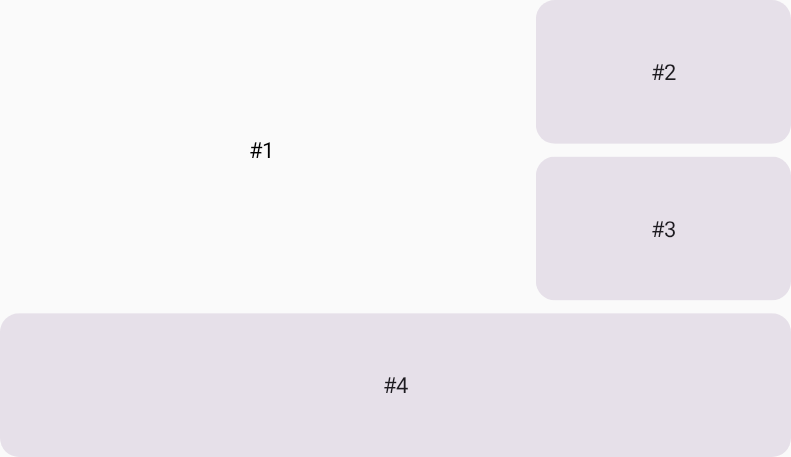 **Figure 3** . The Text with **#1** is placed in the center of the grid area consisting of two rows and two columns.
## Auto-placement mixed with placed items
A UI element in `Grid`
that has no position specification undergoes auto-placement.
This example shows how you can mix auto-placed elements
and the UI elements with specified grid cells.
Card **#2** and Card **#4** are placed in specified grid cells,
and the other items are auto-placed.
```kotlin
Grid(
config = {
repeat(2) {
column(160.dp)
}
repeat(3) {
row(90.dp)
}
rowGap(16.dp)
columnGap(8.dp)
}
) {
Card1()
Card2(modifier = Modifier.gridItem(row = 2, column = 2))
Card3()
Card4(modifier = Modifier.gridItem(row = 3, column = 1))
Card5()
Card6()
}
```
<br />
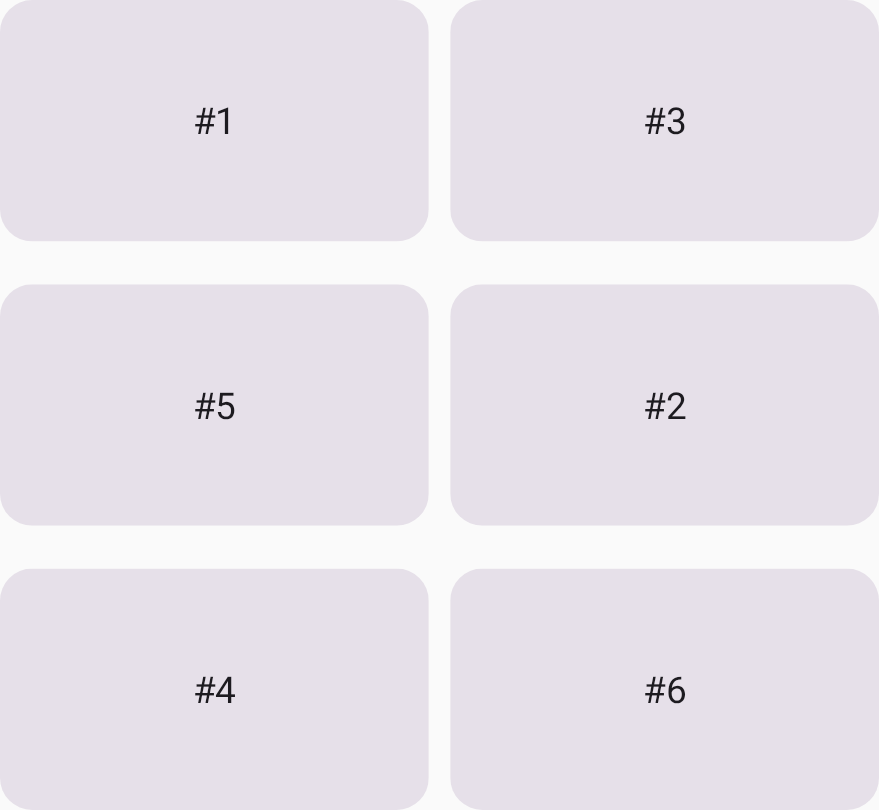 **Figure 4** . Card **#3** is placed next to Card **#1**, as it is an auto-placement.Related skills
| Skill | Stars | Updated | Works with | Status | Install |
|---|---|---|---|---|---|
| brainstormingobra/superpowersYou MUST use this before any creative work - creating features, building components, adding functionality, modifying behavior, or planning anything new, in software or out of it (a talk, a business, a renovation). | Stars: 322k | Updated | Claude CodeCodex | Verified | Install |
| brand-guidelinesanthropics/skillsApplies Anthropic's official brand colors and typography to any sort of artifact that may benefit from having Anthropic's look-and-feel. Use it when brand colors or style guidelines, visual formatting, or company design standards apply. | Stars: 198k | Updated | Claude CodeCodex | Verified | Install |
| frontend-designanthropics/skillsGuidance for distinctive, intentional visual design when building new UI or reshaping an existing one. Helps with aesthetic direction, typography, and making choices that don't read as templated defaults. | Stars: 198k | Updated | Claude CodeCodex | Verified | Install |
| mcp-builderanthropics/skillsGuide for creating high-quality MCP (Model Context Protocol) servers that enable LLMs to interact with external services through well-designed tools. Use when building MCP servers to integrate external APIs or services, whether in Python (FastMCP) or Node/TypeScript (MCP SDK). | Stars: 198k | Updated | Claude CodeCodex | Verified | Install |